Exercise 1 - Custom instructions (VS Code)
このコンテンツはまだ日本語訳がありません。
← Previous lesson: Prerequisites · Next lesson: Agent mode →
Context is key when working with generative AI. If a task needs to be done a particular way — or there’s background information Copilot should know — you want to make sure that context is reachable. There are several ways to share specific context with Copilot. Key among these is instruction files, which are how you provide that guidance about code generation.
In this exercise, you will:
- explore how project-specific context, coding guidelines, and documentation standards reach Copilot through repository custom instructions and path-scoped instruction files,
- generate the first data slice for filtering (a publishers helper) with the current instructions in place,
- add a new repository-wide standard to
.github/copilot-instructions.md, - re-run the same prompt and watch the generated code adopt the new standard,
- commit the instructions update and filtering slice to
mainso Copilot can use the updated guidance in the next exercise.
Generated code may diverge from some of the standards you set. Copilot is non-deterministic. The point of this exercise is to see the trend in behavior change after updating the instructions, not to match output character-for-character.
Instruction files
Scenario
As any good dev shop, Tailspin Toys has a set of guidelines and requirements for development practices. These include:
- The data layer always needs unit tests.
- UI should be in dark mode and have a modern feel.
- Documentation should be added to code in the form of TSDoc doc comments.
- A block of comments should be added to the head of each file describing what the file does.
Through the use of instruction files you’ll ensure Copilot has the right information to perform the tasks in alignment with the practices highlighted.
Custom instructions
Custom instructions allow you to provide context and preferences to Copilot, so that it can better understand your coding style and requirements. This is a powerful feature that can help you steer Copilot to get more relevant suggestions and code snippets. You can specify your preferred coding conventions, libraries, and even the types of comments you like to include in your code. You can create instructions for your entire repository, or for specific types of files for task-level context.
There are two types of instructions files:
.github/copilot-instructions.md, a single instruction file sent to Copilot for every request for the repository. This file should contain project-level information — context relevant for most chat or CLI requests sent to Copilot. This could include the tech stack being used, an overview of what’s being built, best practices, and other global guidance..github/instructions/*.instructions.mdfiles can be created for specific tasks or file types. You can use them to provide guidelines for particular languages (like TypeScript or Astro), or for tasks like creating a UI component or a new set of unit tests.
When working in your IDE, instructions files are only used for code generation in Copilot Chat — not for code completions or next-edit suggestions.
Copilot Chat, Copilot CLI and Copilot cloud agent use both repository-level and *.instructions.md files (with applyTo front matter) when generating code.
Finally, Copilot supports instructions files using other standards, including AGENTS.md and CLAUDE.md files.
Best practices for managing instructions files
A full conversation about creating instructions files is beyond the scope of the workshop. However, the examples provided in the sample project show a representative approach. At a high level:
- Keep instructions in
copilot-instructions.mdfocused on project-level guidance, such as a description of what’s being built, the structure of the project, and global coding standards. - Use
*.instructions.mdfiles to provide specific instructions for file types (unit tests, Astro components, the data layer), or for specific tasks. - Use natural language. Keep guidance clear. Provide examples of how code should (and shouldn’t) look.
There isn’t one specific way to create instructions files, just as there isn’t one specific way to use AI. You will find through experimentation what works best for your project.
Every project using GitHub Copilot should have a robust collection of instruction files. As you explore the ones in this project, you may notice there are files for numerous types of tasks, including UI updates and Astro.
Copilot can also help generate instruction files for you. Each surface exposes this differently (for example, Configure Chat → Generate Agent Instructions in VS Code, or /init in Copilot CLI) — the lesson for the surface you’re on will call it out where it’s relevant.
Looking for templates or a starting point? Explore awesome-copilot, a repository full of instruction files, custom agents, and other resources.
Explore the custom instructions files in this project
Take a moment to read the instruction files this repository ships with — there’s one core copilot-instructions.md and a collection of *.instructions.md files for various tasks. Open these in your editor or the GitHub web UI.
- Open
.github/copilot-instructions.md. - Explore the file, noting the brief description of the project plus sections such as Agent notes, Code standards, Scripts, and Repository Structure. Under Code standards, note the nested GitHub Actions Workflows guidance. These are applicable to any interactions you’d have with Copilot.
- Open the
.github/instructionsfolder and look around. Note there are instructions for Astro files, the Drizzle data layer, tests, and more. - Open
.github/instructions/unit-tests.instructions.md. Note theapplyTofield at the top — this sets a glob (relative to the repo root) that determines which files the instructions apply to. Here, any TypeScript test file (for example, one matching**/*.test.ts) will match. - Note the instructions specific to creating unit tests for this project.
- Finally, open
.github/instructions/drizzle.instructions.mdand scroll to the bottom. Note the links to other instruction files (likeunit-tests.instructions.md) and existing files in the project. This lets you break larger instruction sets into smaller, reusable files, and point Copilot at examples to follow when generating code. (Paths there are relative to the instruction file rather than the repo root.)
The Code formatting requirements section in copilot-instructions.md documents the project’s coding standards, but it doesn’t yet require in-code documentation. In the next steps, you’ll add rules for TSDoc doc comments and file comment headers.
Create a branch for our changes
Let’s follow some best practices here and create a branch for our changes.
-
Return to your codespace from the previous exercise.
-
Open a new terminal by selecting Ctrl+`.
-
Create and switch to a new branch:
Terminal window git checkout -b custom-instructions
Use Copilot Chat before updating the instructions
Open Copilot Chat
Before you start the exercises below, return to your codespace, open the Copilot Chat panel, and select New Chat to start a clean conversation. Mode and model selection vary per exercise — each step calls those out where it matters. To see the impact of custom instructions, start by sending a prompt with the current instruction file in place. Later, you’ll update it and re-send the same prompt to see the difference.
-
Close any open editor tabs from previous exercises so Copilot picks up only the context you want.
-
Open
src/lib/publishers.tsso Copilot knows where the helper should live. -
Select Agent from the agents dropdown in the Chat view so Copilot can apply file changes.
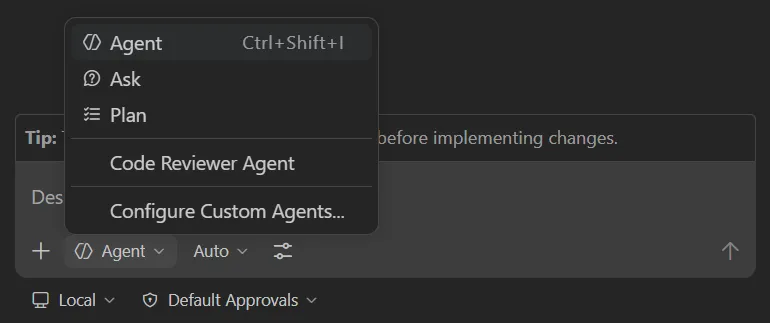
-
Send the following prompt:
Create or update src/lib/publishers.ts with a data-access helper that returns a list of all publishers with the name and id for each. Apply the file changes. -
Copilot explores the project and applies code updates, often spanning the helper file and its tests.
-
Notice the proposed helper is a typed function that takes a
dbclient as its first argument and returns a typed array of publishers — that’s coming from the data-layer conventions in.github/instructions/drizzle.instructions.md(which applies tosrc/lib/*.ts). -
Notice the proposed code is missing TSDoc doc comments and a file-level comment header.
Because Copilot is probabilistic, there’s a chance it’ll add doc comments even without being told to. If that happens, that’s fine — the consistency improvement after the instruction update is still the point.
Add a new repository standard
As highlighted previously, .github/copilot-instructions.md is designed to provide project-level information to Copilot. Let’s ensure repository coding standards are documented to improve code suggestions.
-
Re-open
.github/copilot-instructions.md. -
Locate the Code formatting requirements section, which should be near line 27. Note how it documents the project’s coding standards — but it has no rule yet for in-code documentation, which is why the generated helper had no doc comments.
-
Add the following lines of markdown right below the existing standards to instruct Copilot to add file comment headers and TSDoc doc comments:
- Every exported function should have a TSDoc comment describing its purpose, parameters, and return value.- Before imports or any code, add a comment block to the file that explains its purpose. -
Save
copilot-instructions.md.
As you saw in the previous lesson, instruction files can be created at the repository level (.github/copilot-instructions.md) for global guidance, or as *.instructions.md files for specific languages, file types, or tasks. The repository-level file is the right home for project-wide standards like the doc comment rule you just added.
Re-run the prompt and observe the change
-
Return to Copilot Chat and select New Chat to clear the buffer.
-
Click back into
src/lib/publishers.tsso Copilot focuses on the right file. -
Send the same prompt as before:
Create or update src/lib/publishers.ts with a data-access helper that returns a list of all publishers with the name and id for each. Apply the file changes. -
Notice that the proposed file now opens with a comment block similar to:
/*** Publisher data-access helpers for the Tailspin Toys Crowd Funding platform.* Provides functions to retrieve publisher information from the database.*/ -
Notice that the proposed function now includes a TSDoc comment similar to:
/*** Returns a list of all publishers with their id and name.** @param db - The Drizzle database client.* @returns A promise that resolves to an array of publisher objects.*/
You just steered Copilot to follow a new project standard and apply it to real code that the next exercise will build on.
Commit the instructions and push the branch
Instructions files are just like any asset in the repository, meaning they’re managed using the same source control approach you’d take with any other item. So let’s commit and push the branch to our repository.
-
Open a new terminal window in your codespace by selecting Ctrl+`.
-
From the terminal, confirm your instructions update and helper changes are present by running:
Terminal window git status -
From the terminal, stage and commit the instructions update and every file Copilot changed for the helper foundation:
Terminal window git add .github/copilot-instructions.md src/lib/publishers.ts# If git status shows additional supporting updates (for example tests), add those files too.git commit -m "Add doc comment standards and publishers helper foundation" -
From the terminal, push the branch to the repository:
Terminal window git push -u origin custom-instructions
Create and merge a pull request
With our branch pushed, we should create a pull request and tie it to the documentation-standard issue in your backlog. We could manually do that, but Copilot can do it on our behalf using the GitHub tools that are already connected to your project. Let’s prompt Copilot to find the issue, create the PR to close the issue, and then merge it.
This is the first exercise that has Copilot act on GitHub for you. The project template already wires GitHub’s tools into your workspace, so there’s nothing to set up — the first time Copilot uses one, VS Code may prompt you to sign in to GitHub. Follow the prompts to allow it. You’ll learn how this connection works (Model Context Protocol) in a later exercise.
-
Open Copilot Chat inside of your codespace.
-
Select Control+Command+I (Mac) or Ctrl+Alt+I (Windows/Linux) to open the Copilot Chat view, and ensure Agent is selected from the agent picker.
-
Ask Copilot to find the issue related to updating instructions files and create a PR from the current branch that describes both the instructions updates and the new publishers helper foundation:
Find the issue related to updating the instructions file. Create a new PR from the current branch, highlight that the PR closes that issue, and include that we also added the publishers helper foundation for the upcoming filtering work. -
Copilot will begin work on finding the issue and creating the PR.
-
As prompted to Allow Copilot to perform GitHub actions on your behalf, review the command and select Allow as appropriate.
-
Once the PR is created, ask Copilot to merge the PR and to return your branch to main by using the following prompt:
Merge the PR into main. Then return to main locally, and pull the latest code so we are up to date. -
As prompted to Allow Copilot to perform GitHub actions and run shell commands on your behalf, review the command and select Allow as appropriate.
You have now created and merged a pull request with the help of GitHub Copilot!
Summary and next steps
You explored how Copilot picks up context from instruction files in this project, then used Copilot Chat in VS Code to:
- send a code-generation prompt and observe what Copilot produces with the existing instructions,
- add a new repository-wide standard to
.github/copilot-instructions.md, - re-run the same prompt and watch the proposed code adopt the new standard,
- commit the instructions update and helper foundation to
mainso the next exercise can build on them.
Next, you’ll put those instructions to work in agent mode as Copilot adds a new feature across the codebase.