Exercise 3 - Testing your feature with the Playwright MCP server
이 콘텐츠는 아직 번역되지 않았습니다.
← Previous lesson: Agent mode · Next lesson: Custom agents →
You just built the filtering feature with agent mode. Before you open a pull request, you should confirm it actually works in the browser. Rather than click through the app yourself, you’ll connect the Playwright MCP server and let Copilot drive a real browser to test the feature for you — then publish your branch and open the PR.
In this exercise, you will:
- learn what Model Context Protocol (MCP) is and how MCP servers extend Copilot with new tools,
- add the Playwright MCP server to your workspace,
- ask Copilot to use it to manually test your filtering feature in a browser,
- publish your branch and open a pull request for the filtering work.
What is Model Context Protocol (MCP)?
Agent mode becomes far more powerful when it can reach beyond your editor. Model Context Protocol (MCP) is how Copilot does that — it’s a standard way for the agent to talk to external tools and services.
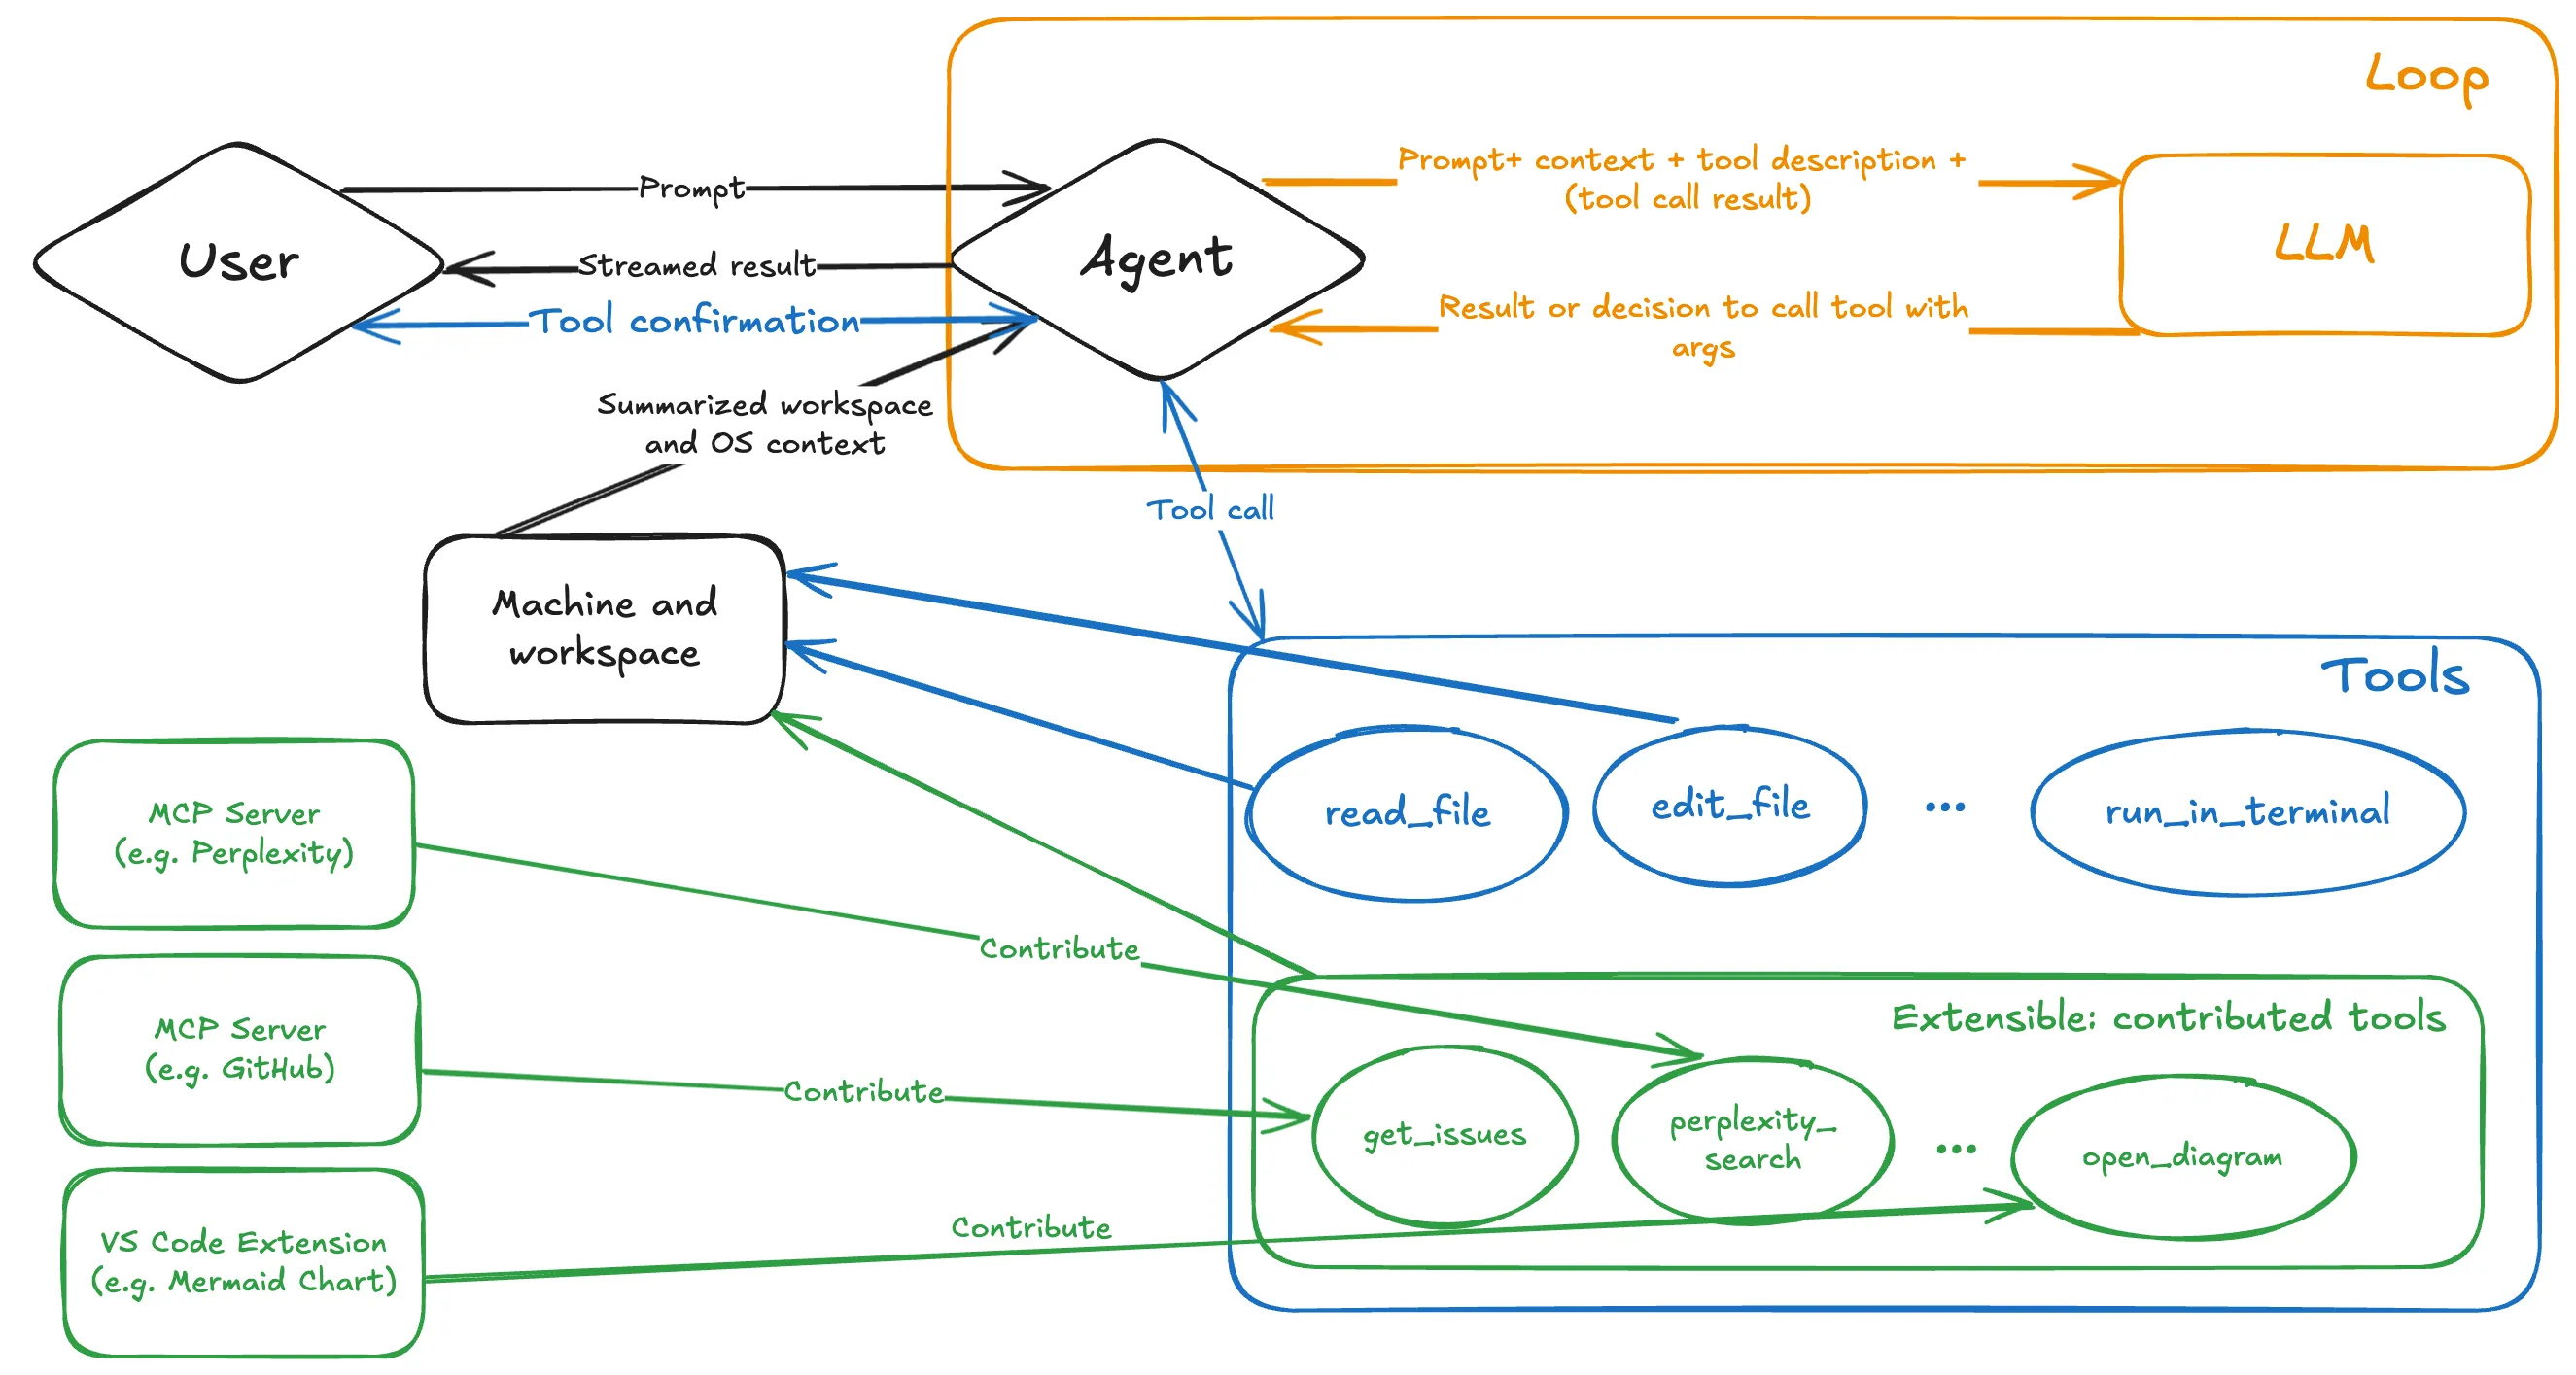
Model Context Protocol (MCP) provides AI agents with a way to communicate with external tools and services. By using MCP, AI agents can communicate with external tools and services in real-time. This allows them to access up-to-date information (using resources) and perform actions on your behalf (using tools).
These tools and resources are accessed through an MCP server, which acts as a bridge between the AI agent and the external tools and services. The MCP server is responsible for managing the communication between the AI agent and the external tools (such as existing APIs or local tools like NPM packages). Each MCP server represents a different set of tools and resources that the AI agent can access.
A couple of popular existing MCP servers are:
- GitHub MCP Server: This server provides access to a set of APIs for managing your GitHub repositories. It allows the AI agent to perform actions such as creating new repositories, updating existing ones, and managing issues and pull requests.
- Playwright MCP Server: This server provides browser automation capabilities using Playwright. It allows the AI agent to perform actions such as navigating to web pages, filling out forms, and clicking buttons.
There are many other MCP servers available that provide access to different tools and resources. GitHub hosts an MCP registry to enhance discoverability and contributions to the ecosystem.
With regard to security, treat MCP servers as you would any other dependency in your project. Before using an MCP server, carefully review its source code, verify the publisher, and consider the security implications. Only use MCP servers that you trust and be cautious about granting access to sensitive resources or operations.
Review the MCP configuration
The .vscode/mcp.json file configures the MCP servers available in this VS Code workspace.
-
Open
.vscode/mcp.jsonin your codespace. -
You should see a
githubserver already configured for you:{"servers": {"github": {"type": "http","url": "https://api.githubcopilot.com/mcp/"}}}
This github entry ships with the project template, which is why Copilot was able to read your backlog of issues in the previous exercise. It uses the remote GitHub MCP server, so there’s nothing to install locally — VS Code connects to it over HTTP and you authenticate with GitHub the first time Copilot uses one of its tools.
Add the Playwright MCP server
Now you’ll add a second server. The Playwright MCP server gives Copilot a browser it can control, which is exactly what you need to test your feature.
-
In
.vscode/mcp.json, add aplaywrightentry alongsidegithubso the file looks like this:{"servers": {"github": {"type": "http","url": "https://api.githubcopilot.com/mcp/"},"playwright": {"command": "npx","args": ["@playwright/mcp@latest", "--headless"]}}} -
Save the file.
Unlike the remote github server, playwright is a local server: VS Code starts it on your machine by running npx @playwright/mcp@latest. The --headless flag tells Playwright to run the browser without a visible window, which is required inside a codespace where there’s no desktop to display it.
The Tailspin Toys project already uses Playwright for its end-to-end tests, so the browser Playwright needs is typically already installed. If Copilot later reports that a browser is missing, have it run npx playwright install chromium and try again.
Start and trust the server
VS Code starts MCP servers on demand — the first time Copilot needs a server’s tools, VS Code starts it and asks you to confirm that you trust it.
- In
.vscode/mcp.json, a Start action appears above theplaywrightentry. Select it to start the server now and confirm the configuration is correct. - If VS Code asks you to confirm that you trust the server, review the configuration and choose to trust it so the server can start.
Starting it by hand is optional — if you skip it, VS Code starts the server (and prompts you to trust it) the first time Copilot needs its tools in the next step.
Test the filtering feature
The Playwright MCP server gives Copilot a real browser to drive. Instead of you clicking through the app to check your work, the agent can open a page, navigate, apply filters, and read the result back to you — then summarize what it saw. It’s the fastest way to confirm a feature behaves the way you expect without leaving the conversation.
Under the hood, the Playwright MCP server works from the page’s accessibility tree rather than screenshots. That means the agent reasons over structured, labelled elements (buttons, links, list items) the same way assistive technology does — so a quick functional check doubles as a light accessibility sanity check.
With the server connected and the app running, ask Copilot to exercise the filtering feature you just built:
Using the Playwright MCP server, open a browser to the running app at http://localhost:4321 and verify the new game filtering feature:
1. Go to the games page and note how many games are listed.2. Apply a category filter and confirm the list updates to only show games in that category.3. Clear it, then apply a publisher filter and confirm the list updates to that publisher.4. Combine a category and a publisher filter and confirm the results respect both.
Report what you observe at each step, and call out anything that does not behave as expected.
Copilot will launch a browser through the Playwright MCP server, walk through each step, and report back what it found. Read its summary against the acceptance criteria in the issue — if something looks off, ask follow-up questions or send it back to fix the code before you open a pull request.
The app needs to be running at http://localhost:4321 for this test. If you stopped the dev server, start it again before sending the prompt. The first time Copilot uses the Playwright MCP server it may need to download a browser — if it reports a missing browser, have it run npx playwright install chromium and try again.
Publish the branch and create a pull request
Now that you’ve confirmed the feature works, you’re ready to open a pull request (PR) so your team can review it. The first step is to publish the filtering-vscode branch.
-
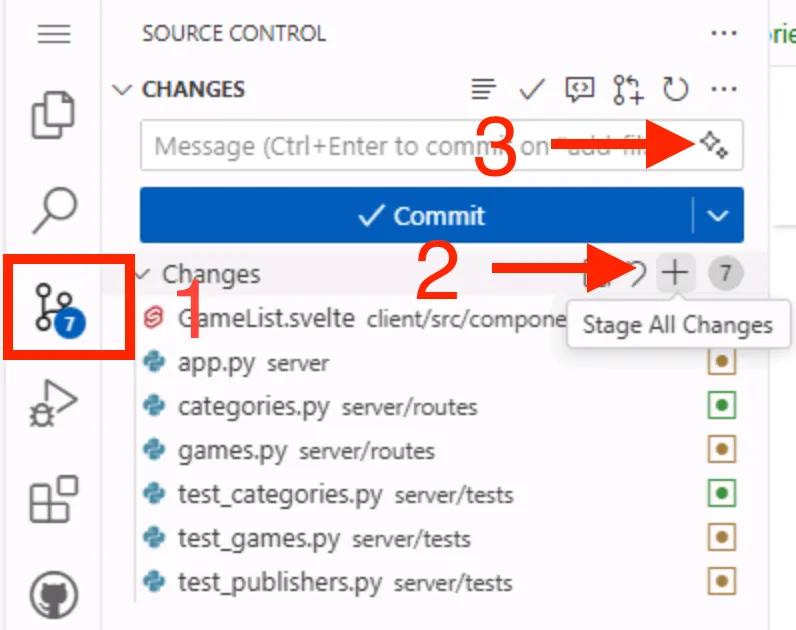
Navigate to the Source Control panel in the codespace and review the changes made by Copilot.
-
Stage the changes by selecting the + icon.
-
Generate a commit message using the Sparkle button.
-
Select Publish to push the branch to your repository.
Create the pull request
There are several ways to create a pull request, including through github.com and the GitHub command-line interface (CLI). But since you’re already working with GitHub Copilot, let’s let it create the PR for you! It can find the relevant issue and create the PR with an association to it.
-
Navigate to the Copilot Chat panel and select New Chat to start a new session.
-
Ensure Agent is selected from the agents dropdown so Copilot can use the GitHub tools.
-
Ask Copilot to create a PR for you:
Find the issue in the repo related to filtering by category and publisher. Create a new pull request for the current branch, and associate it with the correct issue. -
As needed, select Continue to allow Copilot to perform the tasks necessary to gather information and perform operations. The first time it uses a GitHub tool, you may be prompted to authenticate with GitHub — follow the prompts to allow it.
-
Notice how Copilot searches through the issues, finds the right one, and creates the PR.
-
Select the link generated by Copilot to review your pull request, but please don’t merge it yet.
Summary and next steps
Congratulations! In this exercise you:
- learned what Model Context Protocol (MCP) is and how MCP servers extend Copilot with new tools,
- added the Playwright MCP server to your workspace,
- used it to manually test your filtering feature in a browser before shipping it,
- published your branch and opened a pull request for the filtering work.
You used an MCP server to test a feature — but MCP is just one way to extend Copilot. Next, let’s create a custom agent to streamline focused tasks like accessibility reviews.