Lição 7 - Comandos de barra no GitHub Copilot CLI
Como toda boa ferramenta de CLI, o GitHub Copilot CLI inclui vários comandos de barra para interação. Esses comandos expõem funcionalidades avançadas, informações de bastidores ou opções adicionais de configuração. Você já explorou alguns deles, como /clear para limpar o contexto e /mcp para inspecionar servidores MCP. Agora, vamos explorar outros comandos poderosos, incluindo /context, /model, /share e /delegate.
Cenário
Você concluiu os fluxos centrais da CLI. Agora, vamos conhecer algumas capacidades adicionais — compartilhar sessões, trocar de modelo e delegar tarefas ao agente de nuvem do Copilot.
Nesta lição, você usará:
/sharepara criar uma GitHub gist e compartilhar sua sessão com a equipe./contextpara ver o contexto que o Copilot CLI está usando no momento./modelpara explorar a lista de modelos disponíveis e selecionar outro, se quiser./delegatepara, opcionalmente, encaminhar uma tarefa ao agente de nuvem. Isso requer o agente de nuvem, disponível nos planos Copilot Student, Pro, Pro+, Business ou Enterprise — todos, exceto Copilot Free.
Compartilhar uma sessão
Usar qualquer ferramenta, inclusive uma ferramenta de IA, é uma habilidade. Trabalhar em equipe e compartilhar aprendizados é a melhor forma de melhorar a experiência de todas as pessoas e gerar código de maior qualidade. Para apoiar isso, o Copilot CLI oferece o comando /share. O comando /share pode gerar um arquivo markdown ou uma GitHub gist com os detalhes da sessão, incluindo os prompts usados e a lógica seguida pelo Copilot.
Vamos criar uma GitHub gist que você poderia compartilhar com a equipe.
Inicie uma sessão do Copilot CLI
Antes de iniciar os exercícios abaixo, volte ao codespace e abra um terminal (Ctrl+</kbd>, se ainda não houver um aberto). Em seguida, inicie o Copilot CLI com —yoloe—enable-all-github-mcp-tools`:
copilot --yolo --enable-all-github-mcp-toolsPara retomar a sessão mais recente deste projeto em vez de iniciar uma nova, execute copilot --yolo --enable-all-github-mcp-tools --continue. Se o Copilot CLI já estiver em execução por causa de uma lição anterior, envie /clear para começar uma conversa limpa.
--enable-all-github-mcp-tools habilita as ferramentas GitHub MCP de leitura e escrita para a sessão atual, para que o Copilot possa ler seu backlog e abrir pull requests durante o fluxo do workshop.
--yolo habilita permissões automáticas completas (--allow-all-tools, --allow-all-paths e --allow-all-urls). Use-o apenas em um ambiente isolado, como um Codespace ou uma VM, e nunca o defina como alias padrão no seu desenvolvimento diário. Consulte Allowing and denying tool use para saber mais.
-
Na janela de prompt do Copilot CLI, envie o comando a seguir:
/share gist -
Em poucos instantes, o Copilot criará uma gist e exibirá o link.
-
Copie o texto do link.
-
Em uma nova guia do navegador, cole o link para explorar a gist. Observe como a gist destaca os prompts enviados, as skills e os agentes usados, o processo de raciocínio do Copilot e até o código e os resultados de comandos executados localmente.
As gists e os arquivos markdown gerados por /share podem ser usados para documentar como o código foi criado ou para compartilhar com a equipe como determinadas ações foram executadas para obter os resultados desejados com o Copilot.
Explorar o contexto do Copilot CLI
Ao trabalhar em tarefas maiores ou mais complexas, você pode atingir o limite da janela de contexto do modelo. O tamanho exato dessa janela varia de acordo com o modelo usado e a versão do Copilot CLI. Quando a janela de contexto fica cheia, o Copilot CLI a compacta automaticamente, resumindo as informações e removendo tudo o que considerar irrelevante para a tarefa atual. Você pode ver o estado atual do contexto e também compactá-lo manualmente com comandos de barra. Vamos explorar a janela de contexto.
-
Na janela de prompt do Copilot CLI, envie o comando a seguir:
/context -
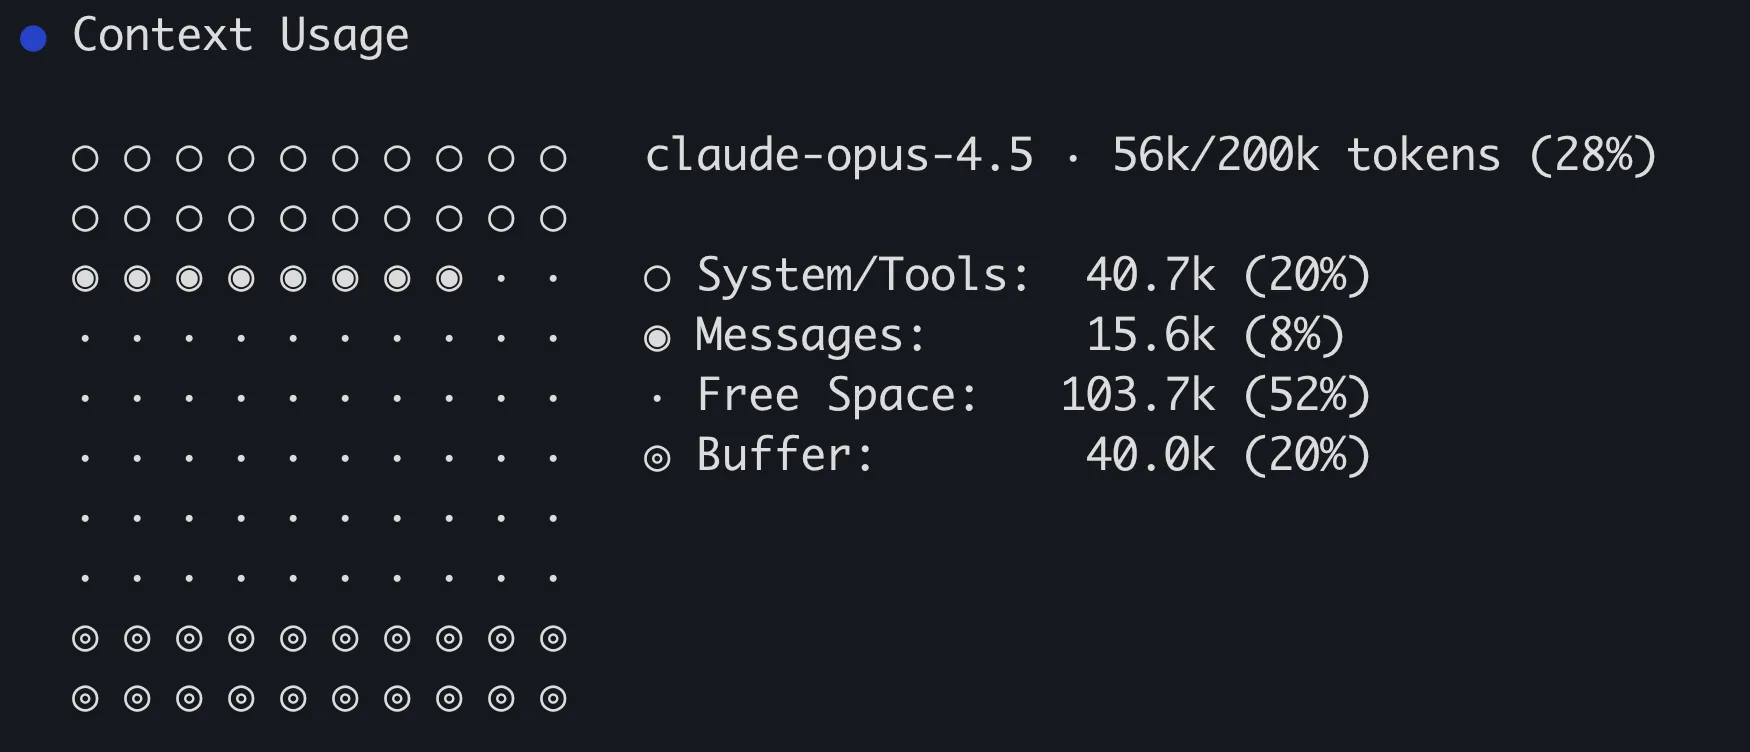
Em poucos instantes, o Copilot CLI gerará uma representação visual do contexto atual:
-
Observe o modelo exibido, que pode ser diferente do mostrado na imagem, e a porcentagem atual de tokens usados. O restante das informações destaca:
Título Descrição System/Tools Arquivos de instruções, conteúdo de arquivos e definições de ferramentas Messages Histórico da conversa entre você e o Copilot Buffer Espaço reservado pelo Copilot CLI para gerar respostas Free space Espaço livre restante -
Compacte o histórico da conversa enviando o seguinte comando de barra ao Copilot CLI:
/compact -
Quando a operação terminar, envie o comando a seguir para exibir novamente as estatísticas atuais do contexto:
/context -
Observe a mudança no contexto. Talvez ela não seja drástica, já que a janela de contexto provavelmente ainda está relativamente pequena neste momento.
O Copilot CLI compactará o contexto automaticamente quando ele estiver cheio. Ao se aproximar de 100% da capacidade, ele exibirá a porcentagem logo acima da janela de prompt. Normalmente, a compactação acontece de forma assíncrona, permitindo que você continue interagindo com o Copilot enquanto ele faz esse trabalho. No entanto, em alguns casos ele pode bloquear uma operação em andamento por vários segundos durante o processo.
Boas práticas com contexto
Na maioria das sessões, o contexto será gerenciado com eficiência pelo próprio Copilot sem orientações específicas. Mesmo assim, pode haver situações em que você decida instruir manualmente o Copilot a limpar ou compactar o histórico:
- Se você for mudar para outra parte do aplicativo ou para uma tarefa não relacionada, pode usar
/clearpara começar de novo e evitar confundir o Copilot com contexto antigo e irrelevante. - Se você estiver se aproximando do limite máximo da janela de contexto, pode usar
/compactmanualmente para controlar quando a compactação acontecerá.
Novamente, na maior parte do tempo, o Copilot gerenciará o contexto sem interação direta sua. Se você perceber que o Copilot está um pouco confuso por causa de informações antigas, ou estiver prestes a mudar para uma tarefa sem relação com a atual, considere usar os comandos manuais.
Escolher seu modelo
Modelos diferentes têm pontos fortes diferentes, e pessoas desenvolvedoras diferentes têm preferências diferentes. O Copilot CLI permite listar e selecionar o modelo que você quer usar.
-
Exiba a lista de modelos enviando o comando de barra a seguir ao Copilot CLI:
/model -
Observe a lista de modelos. Cada modelo exibirá tanto seu nome quanto o modificador de custo por solicitação.
-
Se quiser, selecione um novo modelo. Ou pressione Esc para sair da lista.
A seleção de modelo persiste no Copilot CLI.
Delegar ao agente de nuvem (opcional)
Há situações em que você quer continuar trabalhando no terminal, mas precisa delegar uma tarefa mais demorada ao agente de nuvem do Copilot. O comando /delegate envia a sessão atual do Copilot CLI para o GitHub.com, onde o agente de nuvem a assume, trabalha de forma assíncrona e abre um pull request quando termina.
/delegate requer o agente de nuvem, disponível nos planos Copilot Student, Pro, Pro+, Business ou Enterprise — todos, exceto Copilot Free. Se você não tiver acesso, leia esta seção e pule a parte prática.
-
Primeiro, limpe a sessão atual para evitar delegar o contexto acumulado do workshop:
/clear -
Envie um prompt pequeno e bem delimitado. Por exemplo, você pode delegar a meta extra de paginação do seu backlog:
Implement pagination on the game list page so it shows a fixed number of games per page with Previous and Next controls, and add tests. -
Envie o comando de barra a seguir para entregar a sessão ao agente de nuvem e confirme o prompt que deseja delegar:
/delegate -
Abra Copilot agents no navegador para acompanhar o progresso.
-
Você não precisa esperar a conclusão do pull request neste percurso. Pode voltar a ele mais tarde. Se quiser se aprofundar no gerenciamento de trabalho assíncrono com agentes, continue no percurso do agente de nuvem.
Resumo e próximos passos
Usar comandos de barra no Copilot CLI permite configurá-lo, compartilhar sessões e obter informações internas sobre como o Copilot está trabalhando. Nesta lição, você usou ou explorou:
/sharepara criar uma GitHub gist e compartilhar sua sessão com a equipe./contextpara ver o contexto que o Copilot CLI está usando no momento./modelpara explorar a lista de modelos disponíveis e selecionar outro, se quiser./delegatecomo uma ponte opcional para o agente de nuvem.
É claro que há mais comandos de barra disponíveis e muito mais para explorar no Copilot CLI. Vamos encerrar essa jornada revendo o que aprendemos e vendo alguns próximos passos para continuar aprendendo.